A pdf of the Intaglio – Drypoint: Overview and Getting Started text can be downloaded here.
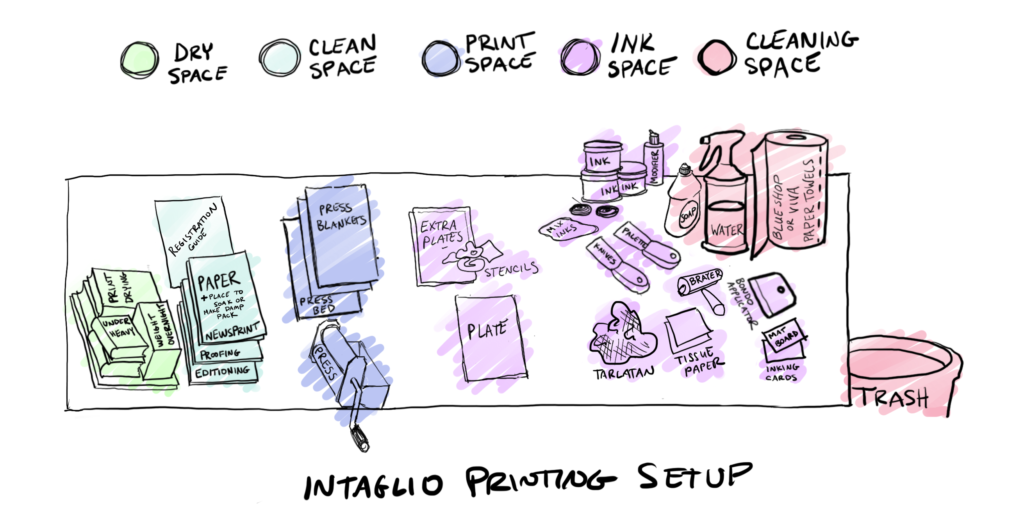
Table of Contents
SUPPLIES
- Printing paper
- Printing plate/s (PETG or Tetra Pak recommended)
- Transfer paper and dull HB graphite pencil (if transferring a guide image)
- Needle tool, twisted scribe, compass point or sharp sewing needle
- If creating aquatint effects, sand paper or carborundum grit and acrylic gloss medium or gesso, along with brushes
- X-acto knife and cutting mat or scissors
- Newsprint
- Ink and modifiers
- Palette knife
- Soft brayer (optional)
- Bondo applicator or mat board squares
- Tissue paper
- Palette knife
- Smooth, non-absorbent surface to mix and roll ink
- Printing press
- Tray to soak paper or plastic bag to create a damp pack
- Space to dry and flatten prints under suspension
- Apron
- Gloves (nitrile recommended)
- Cleaning supplies: vegetable oil and/or mineral oil, dawn dish soap, simple green or 50% white vinegar mixed with 50% water, water, towels
PAPER
For printmaking with limited space, the following papers work well as they are available precut in small sizes and are a thinner weight, allowing for a successful transfer using the lighter pressure of hand printing processes.
Machine-Made (Western) Paper
- Speedball Printmaking Pad (less expensive paper)
- Speedball Arnheim 1618 (more expensive paper)
- Strathmore 300 Series Printmaking Paper (thinner than the 400 series, better for hand printing)
Washi
PETG OR TETRA PAK PLATE?
PETG and Tetra Pak have unique properties that work best with different types of imagery. Artists also use copper and zinc plates for drypoint prints, however, economical and easy to find options are PETG and Tetra Pak plates.
PETG
PETG, a plastic resin of the polyester family, is the material commonly used to make water bottles. It is semi-rigid with good impact resistance, and a slightly soft surface. These qualities make PETG receptive to scribing the plate with a drypoint needle to raise a burr that will hold ink. They also make the burr fragile, crushing easily during printing and limiting the edition size.
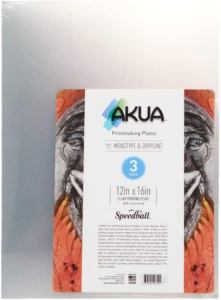
PETG plates are an inexpensive drypoint plate, with a pristine surface that will wipe clean in the smooth or light areas, and allow for a range of burr height that results in value variation. The deeper the incised line and higher the burr, the more printing ink will be held, resulting in a darker printed mark as more ink will transfer from the plate to the paper. PETG’s soft properties make it easier to scribe fluid lines than working on plexiglass, another inexpensive material sometimes used for drypoint. PETG plates are available precut, sold as Akua Printmaking Plates. Inexpensive 4’x8′ sheets are also available at many commercial plastics distributors, and can easily be rolled for transportation then cut to size by hand.
PETG is best for images with pristine whites and variation in line weight and value, and can print up to 15-20 prints before noticeably breaking down. Plates can easily be cleaned between printing and reworked or stored.
TETRA PAK
![]()
Tetra Pak cartons are compressed cardboard food packages sealed on the outside with plastic, and have inner layers of aluminum and plastic. They are made to hold materials such as dairy products, ice cream and beverages.
Recycled from used packaging, Tetra Paks are an affordable option for printmaking. Cartons must be well cleaned before use. Cut the carton open then unfold to create a flat plate. Plates can be cut from within a single side to not have any folds or creases within the image area, or folds and seams can be incorporated into the final image, along with the textured and shaped edges.
Tetra Pak plates work best for graphic images with strong, simple linework and solid areas of black, or images that can conceptually benefit from the specific packaging the plate is created. Edition sizes are limited to 4-5 prints before the plate noticeably breaks down. Ink is difficult to remove after printing due to the fragile nature of the material, making it challenging to store the plate for reworking or for additional printing runs.
TRANSFERRING IMAGERY TO YOUR PLATE
Your image will reverse when printed. Imagery and text should be backwards on the plate.
TRANSFERRING: PETG
Bevel plates thicker than 1/16”. PETG plates are transparent, so reversed guide images can be secured with artist tape to the back of the plate and viewed from the front when scribing the plate. PETG transparency is very useful for aligning imagery on multiple plates, as the plates can be stacked to see how elements from different plates will register once printed.
TRANSFERRING: TETRA PAK
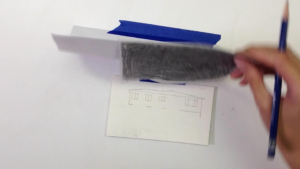
Transferring a guide image to a Tetra Pak plate
Cartons must clean and dry before use. Cut the carton open then unfold to a flat plate. Plates can be cut from within a single side to not have any folds or creases within the image area, or folds and seams can be incorporated into the final image, along with the textured and shaped edges.
Option 1: Begin drypoint plate work without preliminary guides.
Option 2: First draw your image backward on the plate with a dull, soft graphite pencil and light pressure. Do not use heavy pressure as the Tetra Pak may indent, creating incised marks that will hold ink and print. Then, begin plate work.
Option 3: Transfer a drawing using transfer paper, such as Saral or carbon paper, or transfer paper made with soft graphite or iron oxide powder. Place transfer paper pigment side down on top of the plate, beneath an inversed guide image. Secure all three so no shifting occurs. Lightly trace the image onto the plate. Check that no indentations occur in the plate from the pressure of the pencil, as these may hold ink and show up in the final print. Then, begin plate work.
TECHNIQUES: DRYPOINT (FIRST)
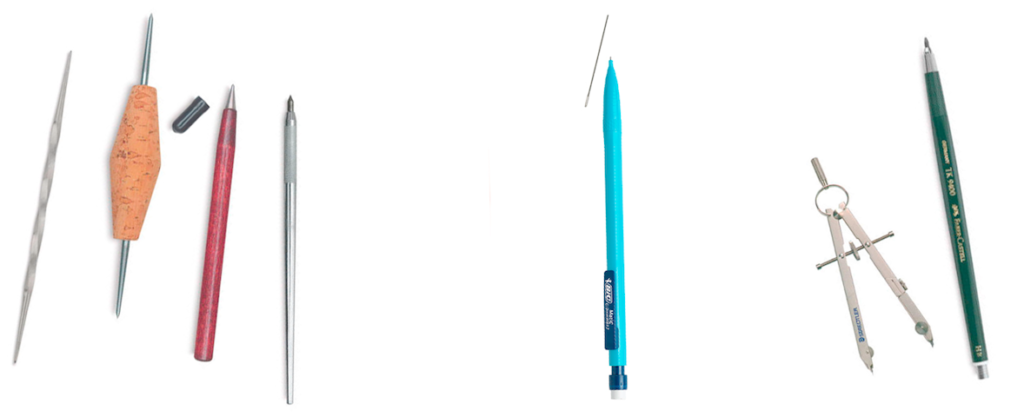
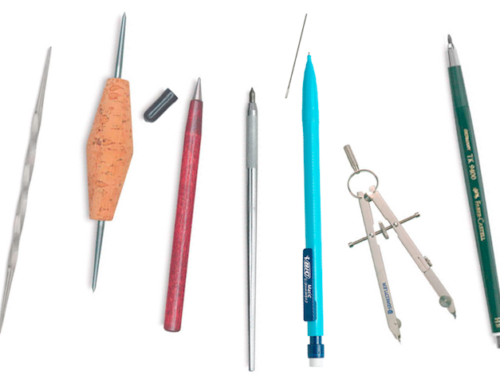
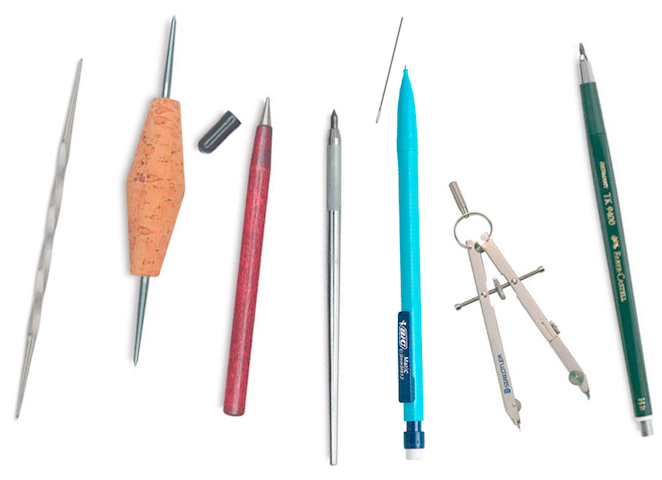
An assortment of scribes, from left to right: twisted scribe, needle tool, diamond point scribe, machinist scribe, mechanical pencil with sewing needle, compass point and clutch pencil holder
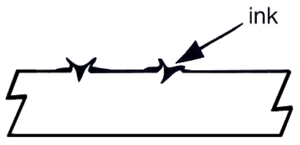
Cross section of a dry point plate
Drypoint is a non-acid technique. Drypoint lines are achieved by scribing the plate, usually with a twisted scribe, raising a burr that catches ink and prints a dark, soft edged, fuzzy line.
A needle tool or twisted scribe is a tool traditionally used by printmakers to scribe lines. A compass needle or sharp sewing needle can also be used. A sewing needle inserted in a mechanical pencil is a terrific scribe, sometimes more effective than a needle tool, as it is very sharp and comfortable to draw with. Hold the tool perpendicular to the surface of the plate. This keeps the burrs on either side of the gouge the same size and increases the longevity of the plate through the rigors of the printing process by making the burrs less susceptible to flattening. Try varying the pressure to get different values. The harder you press, the deeper the gouge, the more ink the burr will hold and the darker the line will be when printed.
PETG will hold more variation in depth, with a wider variation in line weight and detail, while Tetra Pak will hold less variation resulting in a more uniform line weight.
TECHNIQUES: AQUATINT EFFECT (SECOND)
 Aquatint is the intaglio process used to create continuous tone on copper or zinc plates.
PETG
To create areas of continuous tone, carborundum grit or sandpaper are used to create a rough texture. The deeper the groove created, the more ink it will hold and the darker the mark created. However, grooves should be no deeper than 1/16”. Sandpaper can be used to roughen the plate surface to create gray tones. Areas can be masked with tape or frisket film to keep them from getting abraded. Wet/dry sandpaper can be adhered to the plate for black tones. To adhere wet/dry sandpaper, ensure the plate is degreased and dry, then coat the back of the sandpaper and the PETG with gloss acrylic medium. Apply the wet/dry sandpaper to the PETG, and hold flush with a weight until dry. Medium grit sandpaper should be used, as fine grit tends to lose texture quickly and coarse grit tears the tarlatan during wiping. Carborundum grit, a material used in stone lithography, can be adhered to the plate surface with gloss acrylic medium. Fine play sand may also be used in place of carborundum. Note, sandpaper and carborundum grit will print very dark. To lighten the mark, fill the texture with layers of acrylic medium to fill in the grooves between the grit so they hold less ink and print lighter.
Tetra Pak
The top plastic and aluminum layer of the Tetra Pak can be peeled away to reveal the rough cardboard beneath. This cardboard layer will be very absorbent, holding much ink and printing a solid value.
PRINTING
Printing is the process of using pressure to transfer the image from the matrix to the substrate.
PAPER
- If your paper needs to be cut or torn down, first figure out maximum paper usage, then clean the work surface and tools.
- Many printmakers prefer to tear their paper to create a deckled edge. Tear paper with the back side facing up (the side with regular screen pattern). Traditionally prints have a 2 to 3 inch margin on the sides and top, with the bottom weighted an extra half-inch.
- Cut several sheets of newsprint slightly larger than the editioning paper.
- Make a newsprint registration guide with a ballpoint pen, including T-Bar registration marks. Mark your printing paper with the corresponding T-Bar registration marks.
- Soak paper
-
- If your paper needs to be cut or torn down, first figure out maximum paper usage, then clean the work surface and tools.
- Many printmakers prefer to tear their paper to create a deckled edge. Tear paper with the back side facing up (the side with regular screen pattern). Traditionally prints have a 2 to 3 inch margin on the sides and top, with the bottom weighted an extra half-inch.
- Cut several sheets of newsprint slightly larger than the editioning paper.
- Make a newsprint registration guide with a ballpoint pen, including T-Bar registration marks. Mark your printing paper with the corresponding T-Bar registration marks.
- Soak paper
- Misting: Waterleaf papers, or papers without sizing, and washi paper typically only need even misting with water. Washi is typically printed with a damp carrier sheet behind, using a thicker, machine made paper to push the washi into the plate grooves.
- Water bath: This method works best for small runs and unplanned printing. Place the paper in a water bath, timing so the paper and printing plate are ready at the same time. Each paper requires a different soak time to soften the fibers and release sizing. Soak times for Rives BFK, a heavily sized paper, are 45-minutes to 12+ hours. Moderately sized paper, such as Stonehenge, are 30-minutes to 2+ hours. Optimal soak times may vary based on local relative humidity. Leave paper soaking until the plate is ready to print.
- Damp pack: This method works best for editioning or if optimal paper soak time for sized paper is unknown. Paper is prepared the day. Dip each sheet in a tray of water so both sides become wet. Remove from the water and allow excess water to drip off, then form into an even stack and place inside an air tight plastic bag, such as a Ziploc storage bag. Place even weight on top, such as a heavy book, and allow the stack to sit overnight. The water will evenly distribute throughout the paper stack. Before printing, flip the stack over to redistribute any settled water. Leave paper in the damp pack until the plate is ready to print. Reseal the bag between prints.
-
PRINTING INK
(excerpted from https://www.imcclains.com/catalog/ink/Caligointro.html)
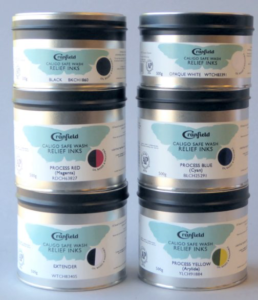 Caligo safe wash oil-based relief inks have the luminosity and opacity of oil-based inks with the convenience of soap and water cleanup. These inks will not reactivate with water after they fully dry, are lightfast and highly pigmented. The ink can be printed on dry or damp paper. Since the ink is designed to emulsify in soap and water, it is recommended to print with fairly dry paper and make sure there is no surface water on the paper.
Caligo safe wash ink dries by oxidation and polymerization. The ink dries most efficiently if it is printed on absorbent, acid free paper and allowed to dry in a warm and dry environment. Dry wet prints overnight under suspension, such as pinning prints to a board, or weight, by layering the prints between clean newspaper with a stack of books on top. This will keep the paper from warping as it dries.
VISCOSITY
Describes the thickness or looseness of an ink. To loosen ink, oils compatible with the ink are added. Caligo safe wash inks use Caligo oil thinner so the inks remain water soluble. To stiffen ink, magnesium carbonate powder is added.
TACK
Describes the stickiness of an ink. Tack reducers are modifiers that can be added to reduce the tack, or stickiness, of an ink. Caligo inks use the Caligo wiping compound and tack reducer.
OPACITY
Describes the transparency or opacity of an ink. All ink is a little transparent. To make ink more opaque, add a small amount of white ink. To make ink more transparent, mix with transparent base. Transparent base is unpigmented printing ink.
ETCHING PRESS SETUP
- Clean press bed with Simple Green or 50% white vinegar/50% water.
- Engage blankets partway beneath roller:
- Sizing catcher (thinnest) on bottom
- Cushion (thickest) in middle
- Pusher (medium thickest) on top
- Place registration guide on the press bed beneath duralar. The duralar will protect the registration guide from any ink, allowing cleanup between prints, and preserving the white of the paper.
PASTA MAKER AND EMBOSSING MACHINE SETUP
- Prepare press as needed, such as clamping pasta maker to table surface.
- Clean press bed with Simple Green or 50% white vinegar/50% water.
- Order your printing packet, ensuring the sides align. From bottom to top: bed support, template, duralar, inked plate with ink facing up, dampened printing paper front side facing plate, newsprint, blankets/cushion. Note, you may need to experiment with pressure settings and stacking order to achieve optimal results. If your print is too light, try increasing pressure or adding more cushion with additional sheets of newsprint. It is better to start with light pressure and go heavier if needed to not damage equipment or the plate.
INKING
- Degrease PETG plate with dawn dish soap and rinse well. Dry with a hair dryer or clean paper towel. Do not degrease a Tetra Pak plate as it may fall apart if it gets wet.
- Put on nitrile gloves.
- Mix ink with appropriate modifiers to achieve desired tack and viscosity. To print as intaglio ink, the Caligo Safe Wash Relief Inks are modified with miracle gel reducer to reduce tack, about about a pea sized amount per tablespoon of ink. Next, a minimal amount of Caligo Safe Wash Oil is added to thin the ink as needed. Thinner ink will produce more tonal variation and stiffer ink will produce a higher contrast print.
- The preferred method to apply ink is to roll the ink on using a soft brayer. Alternately, card ink onto the plate with light pressure, using either a bondo applicator, a mat board square, or a gloved finger, and gently pushing ink into the grooves. Remove excess ink by gently blotting with clean newsprint. Alternately, lightly scrape over the plate with a bondo applicator or mat board card.
- Wipe the plate in a circular motion with a puff of soft tarlatan, gently skim the surface only. Begin with a slightly inky tarlatan and then switch to a cleaner one for final wiping. While wiping hold the plate from the side to avoid putting finger prints on the plate surface. Wipe from light areas toward dark areas. Clean the puff of tarlatan every few turns on the plate to remove excess ink from the tarlatan. When wiping a Tetra Pak plate, wipe from the center to the incised or cut edges on areas that may separate or tear off.
- To brighten the light areas, selectively paper wipe with tissue paper and light pressure, removing ink from the surface only. This removes plate tone and brings out the whites.
- Clean edges and back with a cotton rag or paper towel. Avoid touching the plate surface.
PRINTING ON AN ETCHING PRESS
- Place the registration guide on the clean press bed, place duralar over.
- Place the inked plate face up, aligning with the registration guide.
- Have newsprint ready, cut slightly larger than the editioning paper.
- Wash hands. Ensure only clean hands when handling paper.
- Prepare paper. Remove the paper from the damp pack or soaking tray. Let excess water drip off a corner. Squeegee then blot the damp paper on blotters or clean, smooth towels.
- Place paper front side down over the inked plate, aligning the registration marks.
- Place newsprint over the editioning paper.
- Pull blankets down, smooth out wrinkles and crank consistently all the way through press.
- Pull blankets back. Slowly remove print from the plate. Put print between clean newsprint and dry under even weight, such as heavy books, for at least 24 hours until paper is dry. Ink may still be wet.
PRINTING ON A PASTA MAKER OR EMBOSSING MACHINE
- Clean press bed with Simple Green or 50% white vinegar/50% water.
- Stack your packet ensuring side edges align. From bottom to top: bed support, template, duralar, plate ink side up, damp printing paper front side down, newsprint, blankets/cushion. Note, you may need to experiment with pressure settings and with stacking order to achieve optimal results. If your print is too light, try increasing pressure or adding more cushion with additional sheets of newsprint or additional felt/blankets. Craft foam works well as cushions for this type of press.
- Engage the stack in the press rollers and begin rolling through, supporting the stack as needed until it reaches the other side.
- Slowly remove print from the plate. Put print between clean newsprint and dry under uniform weight, such as heavy books, for 24+ hours until paper is dry. Ink may still be wet.
CLEAN-UP
PETG PLATE: At your work station, first offset excess ink onto newsprint. Clean with a minimal amount of vegetable oil and then mineral oil and a tooth brush, then wash with Dawn dish soap. Rinse with clean water.
TETRA PAK PLATE: First, offset excess ink onto newsprint, then gently rub off remaining ink with an absorbent cotton rag or paper towel. Do not use water or soap. The plate will remain stained.
PRESS: Clean duralar with Simple Green, or 50% white vinegar/50% water, and remove template from bed. Clean the bed or bed support. Disengage blankets. Clean the press as needed.
GLASS SLAB: First, scrape up ink with a palette knife, cleaning palette knife as needed on phone book pages. If there is more than a half tablespoon of ink, save in a labeled foil packet. If less than a half tablespoon, throw away. If working on a glass slab, next use a razor scraper until there is minimal ink remaining. For oil based ink, wipe the slab with vegetable oil, followed by mineral oil, and then degrease with Simple Green or 50% white vinegar/50% water. For water-soluble oil based ink use dish soap and rinse with water. Bag tarlatan in a Ziploc bag.
TOOLS: Clean tools as appropriate, first wiping off excess ink with newsprint or paper towel, then cleaning with dish
FOR MORE INFORMATION:
The Dining Table Studio post on drypoint using plastic packaging
Handprinted post on dry point printing with a plastic plate
Handprinted post on dry point and collagraph printing with Tetra Pak
Canson Studio post on Tetra Pak dry point
Akua Printshop YouTube video on drypoint with Susan Rostow
Nontoxicprint.com Drypoint and Monoprint